Getting Orders Shipped with Magento2
Time and time again, we see new Magento 2 admins feel overwhelmed when it comes to processing the orders placed through their store. In a world where shipping an order 'same day' is expected, how do you efficiently process your orders through a default Magento2 installation?
Here's the most common scenario:
- A customer browses the site and adds one or more items to their cart
- That customer successfully completes the checkout process, paying with their credit card or Paypal
- Magento creates the order, issues an invoice to the customer (via email) and assigns the order status of 'Processing'
So what next? Now it's up to you (the store admin) to continue 'processing' (aka pick, pack and ship) the order.
Everyone works differently, but here's a 'default' guide that you might find helpful to base your workflow off.
- Print a list of orders (and the products to process)
- Pick those products (from your warehouse)
- Pack the orders
- Print shipping labels
- Mark the order/s as shipped
There are a number of Magento2 extensions out there which may work better for your scenario. This article simply provides a guide on how you're able to process orders using the 'out of the box' Magento2 features.
Step 1. Generate the Packing Slips
Numerous customers have placed their orders that are sitting in the system with the status of 'processing'. Our warehouse staff now need to process these orders.
Our warehouse staff will:
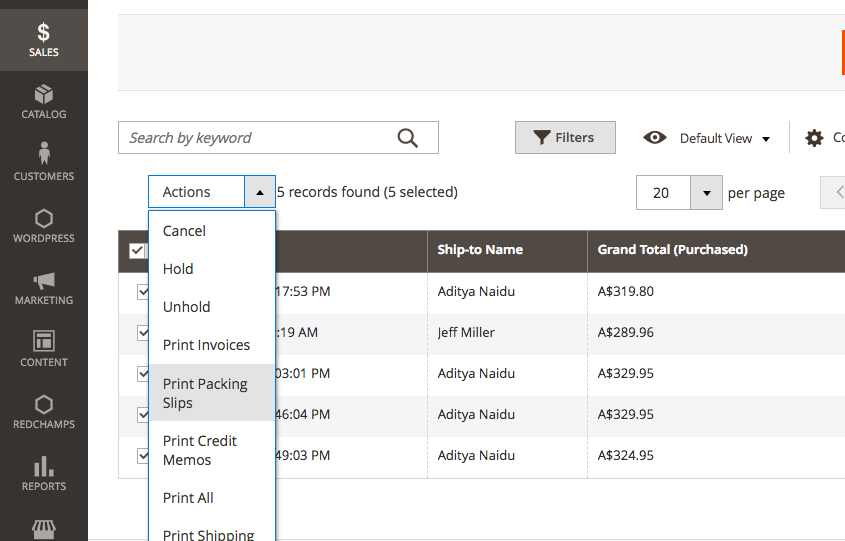
- Login to the Magento admin
- Visit Sales > Orders and use the filter to show only those with the status of 'Processing'
- They tick all orders they wish to process and use the Actions dropdown to 'Print Packing Slips'
This gives us a single PDF with each Order to a page, containing all products in this Order.
Step 2. Pick the Products
Our warehouse team member now has a list of all products they need to pick. They can either print this PDF or use an iPad PDF reader and walk through the warehouse, pick the products shown on the list and mark off those they've retrieved.
Step 3. Pack the Orders
Perhaps they've just picked 5 orders, and have all of the products in a trolley. It's now time to pack the orders.
Using the same Packing Slips, they can place each of the order's products into the appropriate packaging (be it an envelope, satchel, box etc).
Step 4. Shipping Labels
Using your respective shipping provider's tools, the warehouse team member will print the shipping labels (with the customer's address) for all of the orders in front of them and stick the label onto the appropriate package.
Alongside printing each shipping label, they should also get a tracking code which they should make note of on the corresponding packing slip (they'll use it next).
Step 5. Mark the Order as Shipped
Back at the computer in the Magento back-end, the warehouse team member will now:
- Go through each Packing Slip and edit the respective order (in Magento > Sales > Orders)
- They'll then simply hit the 'Ship' button and add the tracking number/s to the shipment.
This will change the order status as 'complete' and can notify the customer that the order has been shipped.
